[App Reviews] Leo’s 5 essential apps

Stock apps aren’t always the best option, sometimes developers neglect the problems and requests of those who use their apps, while other developers are working on better 3rd party alternatives with better support. There are plenty of other options all around, whether you look in the Play Store or XDA you’ll more than likely find something better. A couple of us here at AndroiDeputies have decided to share our experience with some of these apps and hope that our insight can help you choose what’s right for you. I will share my top 5 Play Store app reviews in this article while other members of AndroiDeputies will do the same with their favorite apps in separate articles.


Swipe for Facebook 

wp-1483778164173.png

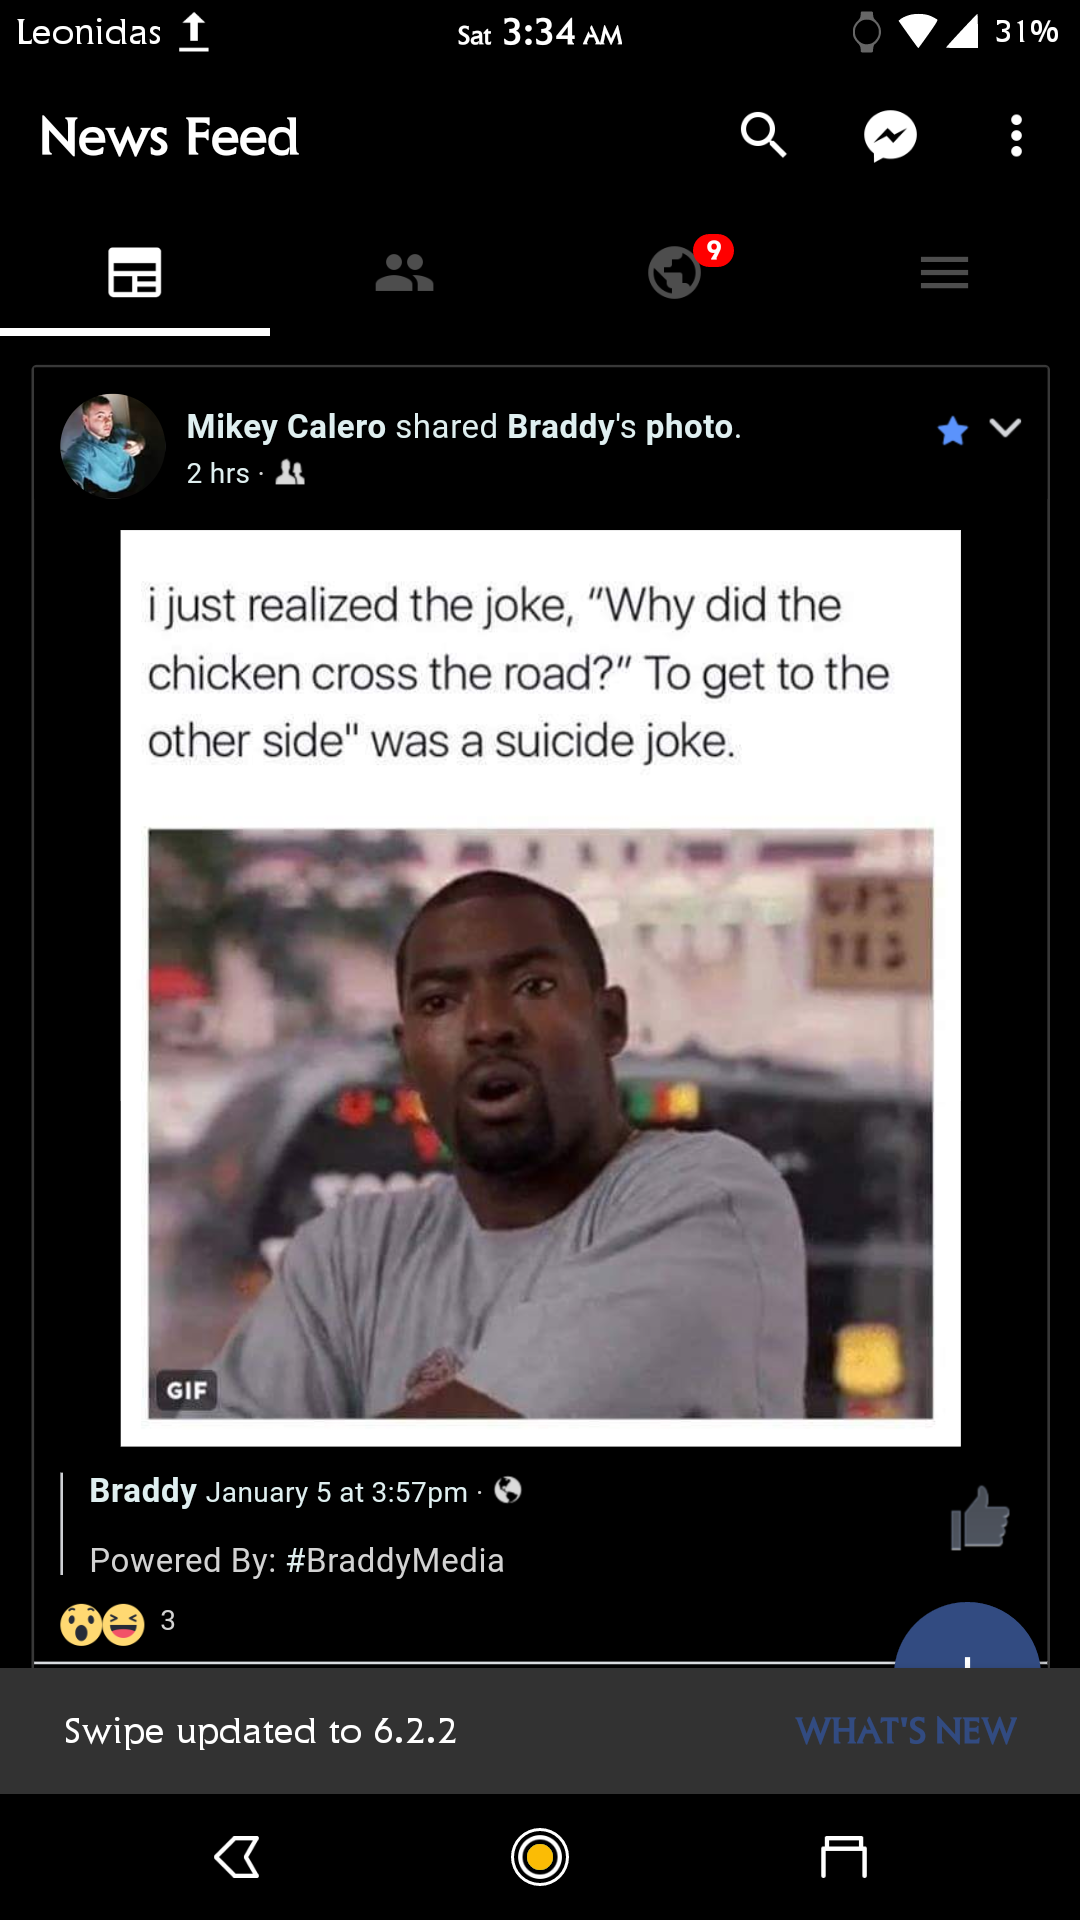
This is a personal favorite. It’s a lightweight and very powerful and very functional Facebook client GUI. You have the option of customizing the app in many ways, from the color to the design of the layout, such as giving it a Google+ look and a material design. One of the best features is having access to my messages without having to install the official Facebook Messenger. You can also receive notifications from the app, for messages as well, and there are some neat widgets for Swipe as well for those notifications. There are features for battery saver. You may also choose to load all tabs at once or only load what tabs you are using. There’s also a pro version for $2.99, with pro you can unlock a lot more features and themes. The developers working on this deserve whatever profit they make, buy pro and treat them to a coffee or drink sometime.

Swipe for Facebook on Play Store (free)

Swipe for Facebook on Play Store (pro)


Pulse (SMS/Tablet Messenger)

wp-1483779228583.jpg

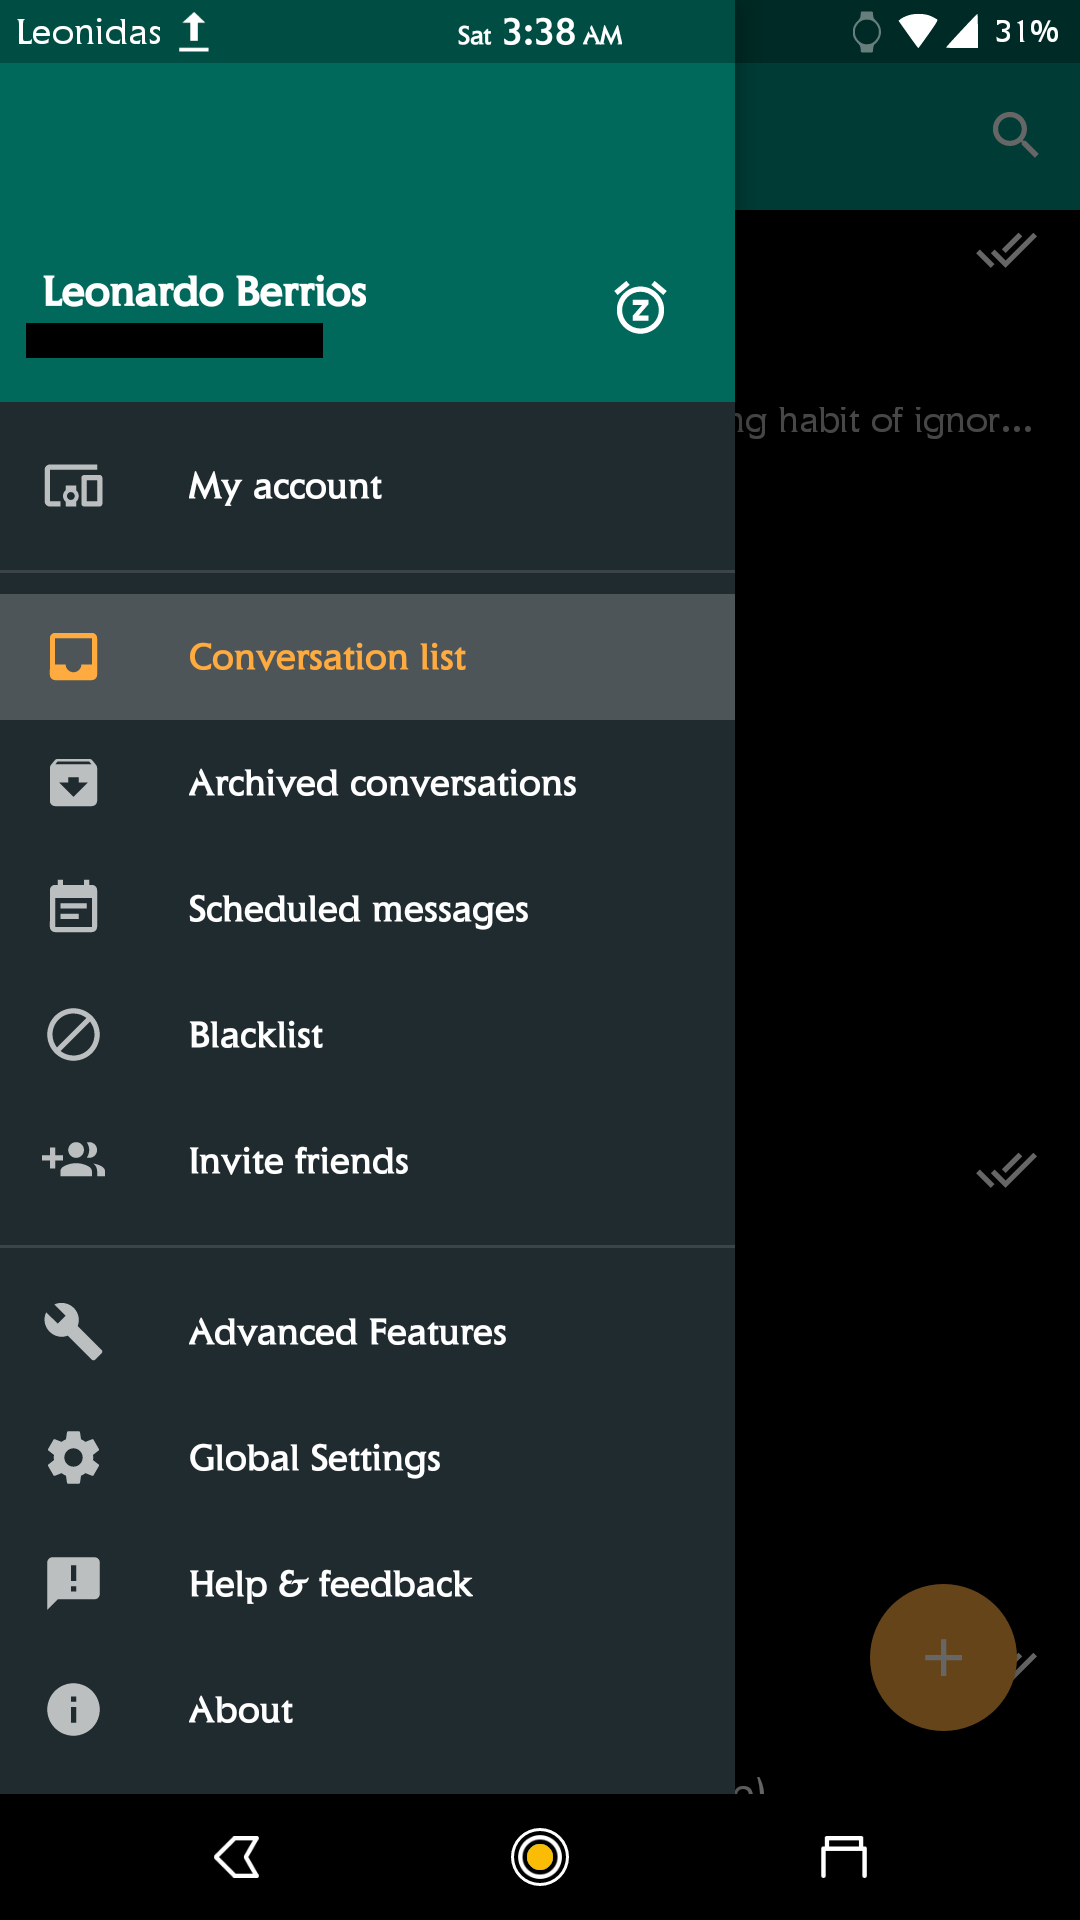
This is the texting app I’ve decided to ultimately stick with. I was a beta tester for this one and I was very pleased with it! If you have a habit of losing your phone and you’d like some peace of mind knowing you didn’t lose all of your SMS & MMS conversations, if you’re a person that likes to flash custom aftermarket versions of Android and constantly factory reset your phone but want a reliable way of restoring conversations, if you like having access to all of your messages on many different types of devices, then look no further. Pulse allows you to create an account that enables you to access your conversations anywhere anytime, but that’s not even the best part. My personal favorite feature is having my conversations automatically backed up to my account on their servers. The awesome thing about this feature is how easy it is to retrieve conversations from your account OTA.

With Pulse you are in full control of your conversations. You can schedule messages, archive conversations to keep your inbox clean without necessarily getting rid of your old conversations, blacklist whoever you may not want to hear from, you can also snooze notifications with ease, you may change the appearance in many different ways such as per-contact color schemes, and you can pin conversations on the top of the list. There are far more features but these are the ones I wanted to highlight. I would highly recommend Pulse to anyone who would want a more organized and more secure personal texting experience on their device.

There are a few subscription plans. You have an option of paying per month, per 3 months, per year, and a one time lifetime subscription payment. Once you have chosen a plan you will have the charge billed to your Google Play account, you may choose to cancel your subscription before being charged but your account will also be deleted as a result. I chose a lifetime subscription for one payment, I wouldn’t have paid that price if I wasn’t pleased with Pulse and I don’t usually pay more than $10 for any subscriptions of any sort.

Pulse (SMS/Tablet Messenger) on Play Store


KLWP Pro 

wp-1483778197592.png

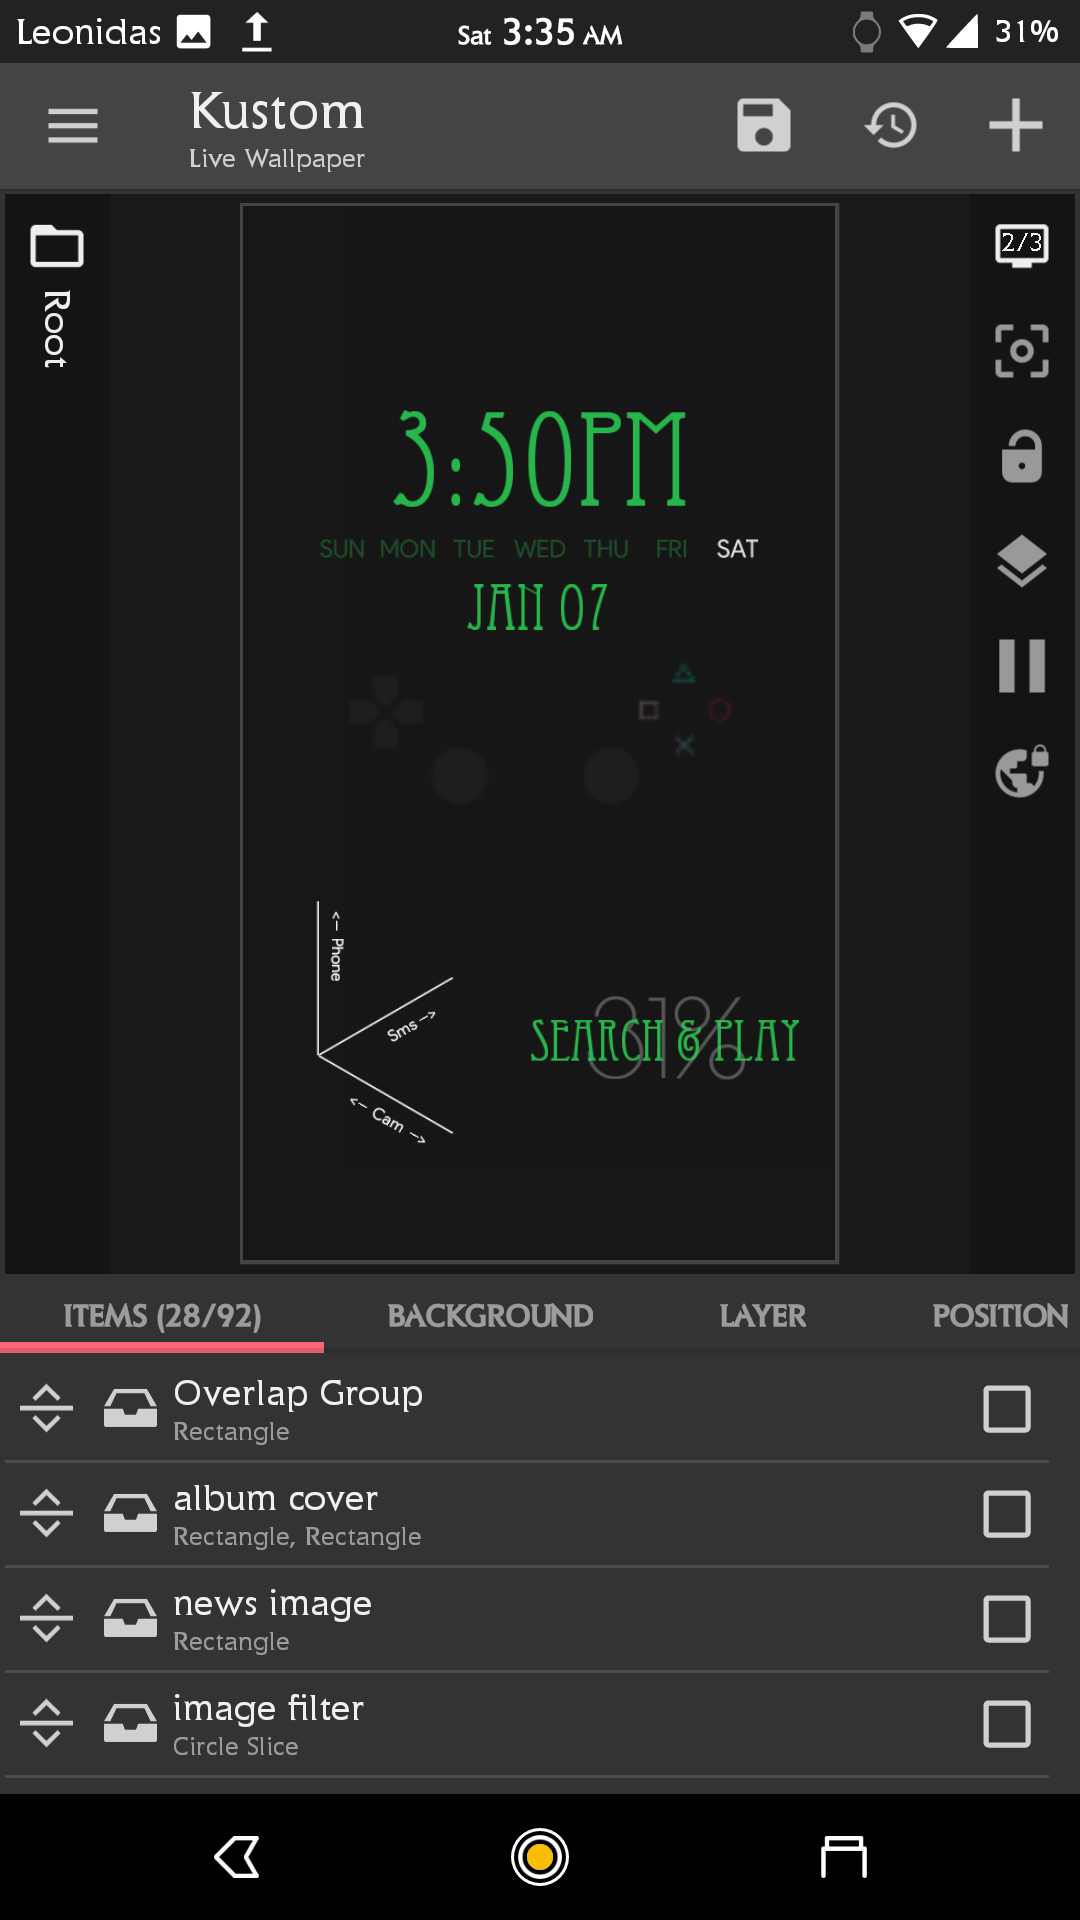
This is one of the most interesting apps I’ve come across. It’s a highly interactive and customizable live wallpaper. The possibilities are endless and users may choose to import and export their themes for easy sharing. It’s still really battery friendly and most likely won’t make your device launcher sluggish (YMMV). I highly recommend setting this up with Nova Launcher for the best user experience. This live wallpaper eliminates the need to use widgets, that alone may help save RAM and battery. There’s a free version and a pro version, you will need the pro version to enjoy it to the fullest, such as being able to use other themes published by other people who design KLWP themes.

KLWP Live Wallpaper Maker on Play Store

KLWP Live Wallpaper Pro on Play Store


Root Explorer 

wp-1483779959072.png

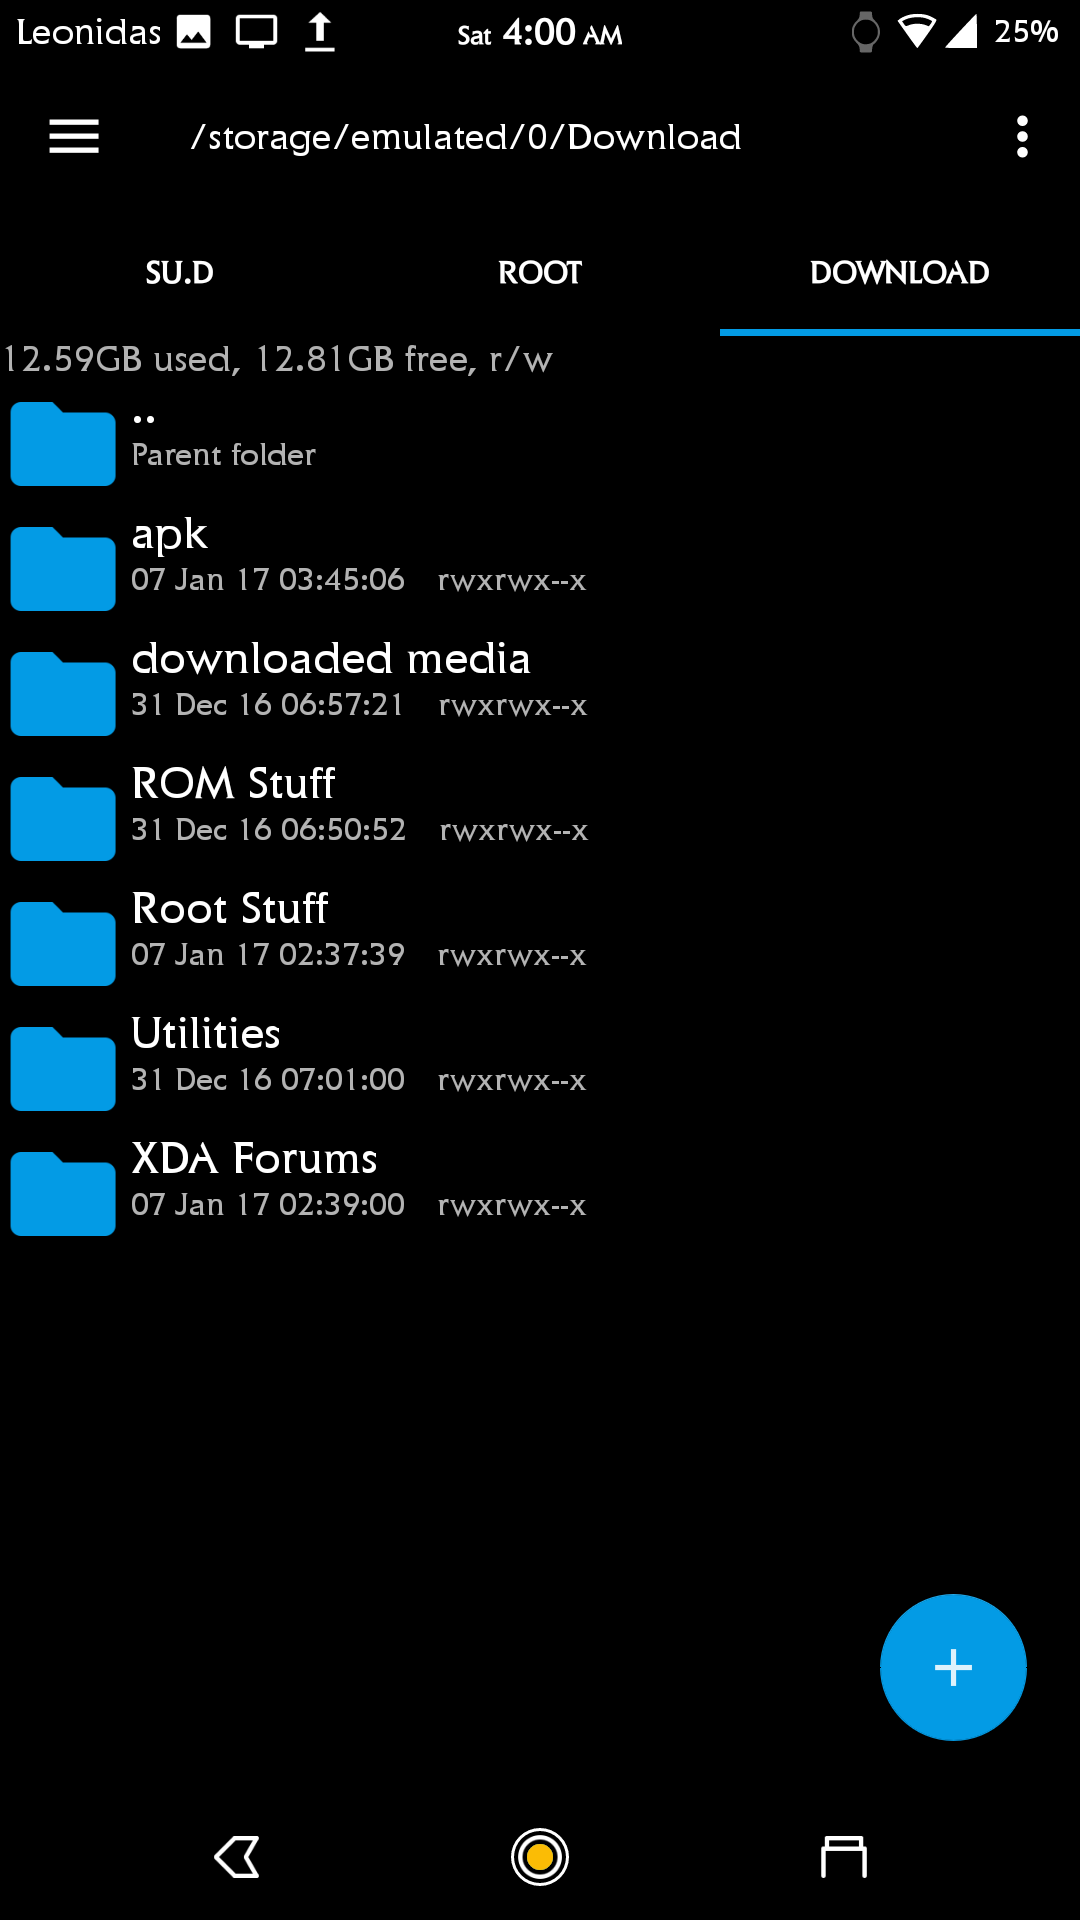
A powerful and efficient file manager is important to have, there are many options in the Play Store but I always find myself using this one the most. Most devices already have a default file manager included, but those are never good enough to be fully usable. This is one of the very first Android apps I’ve ever used and I use it pretty much every day. I often find myself using Root Explorer to manually edit my build.prop and move things over to system and it even helps change permissions with ease, especially after flashing ROMs. You can use Root Explorer to view and extract archive files, you can also use it to create archives with different options for compressing the archives you make. You may also link some cloud storage services with Root Explorer, such as Google Drive and Box. If you have root access you may even run some scripts within the app. You may also choose to open files with external apps of your own choice. The best thing about Root Explorer is probably just how lightweight it is, it doesn’t try too hard but it gets so much done with ease.

There’s a free version without root features, I highly suggest buying it instead.

Root Explorer on Play Store


Citymapper

wp-1483783831509.png

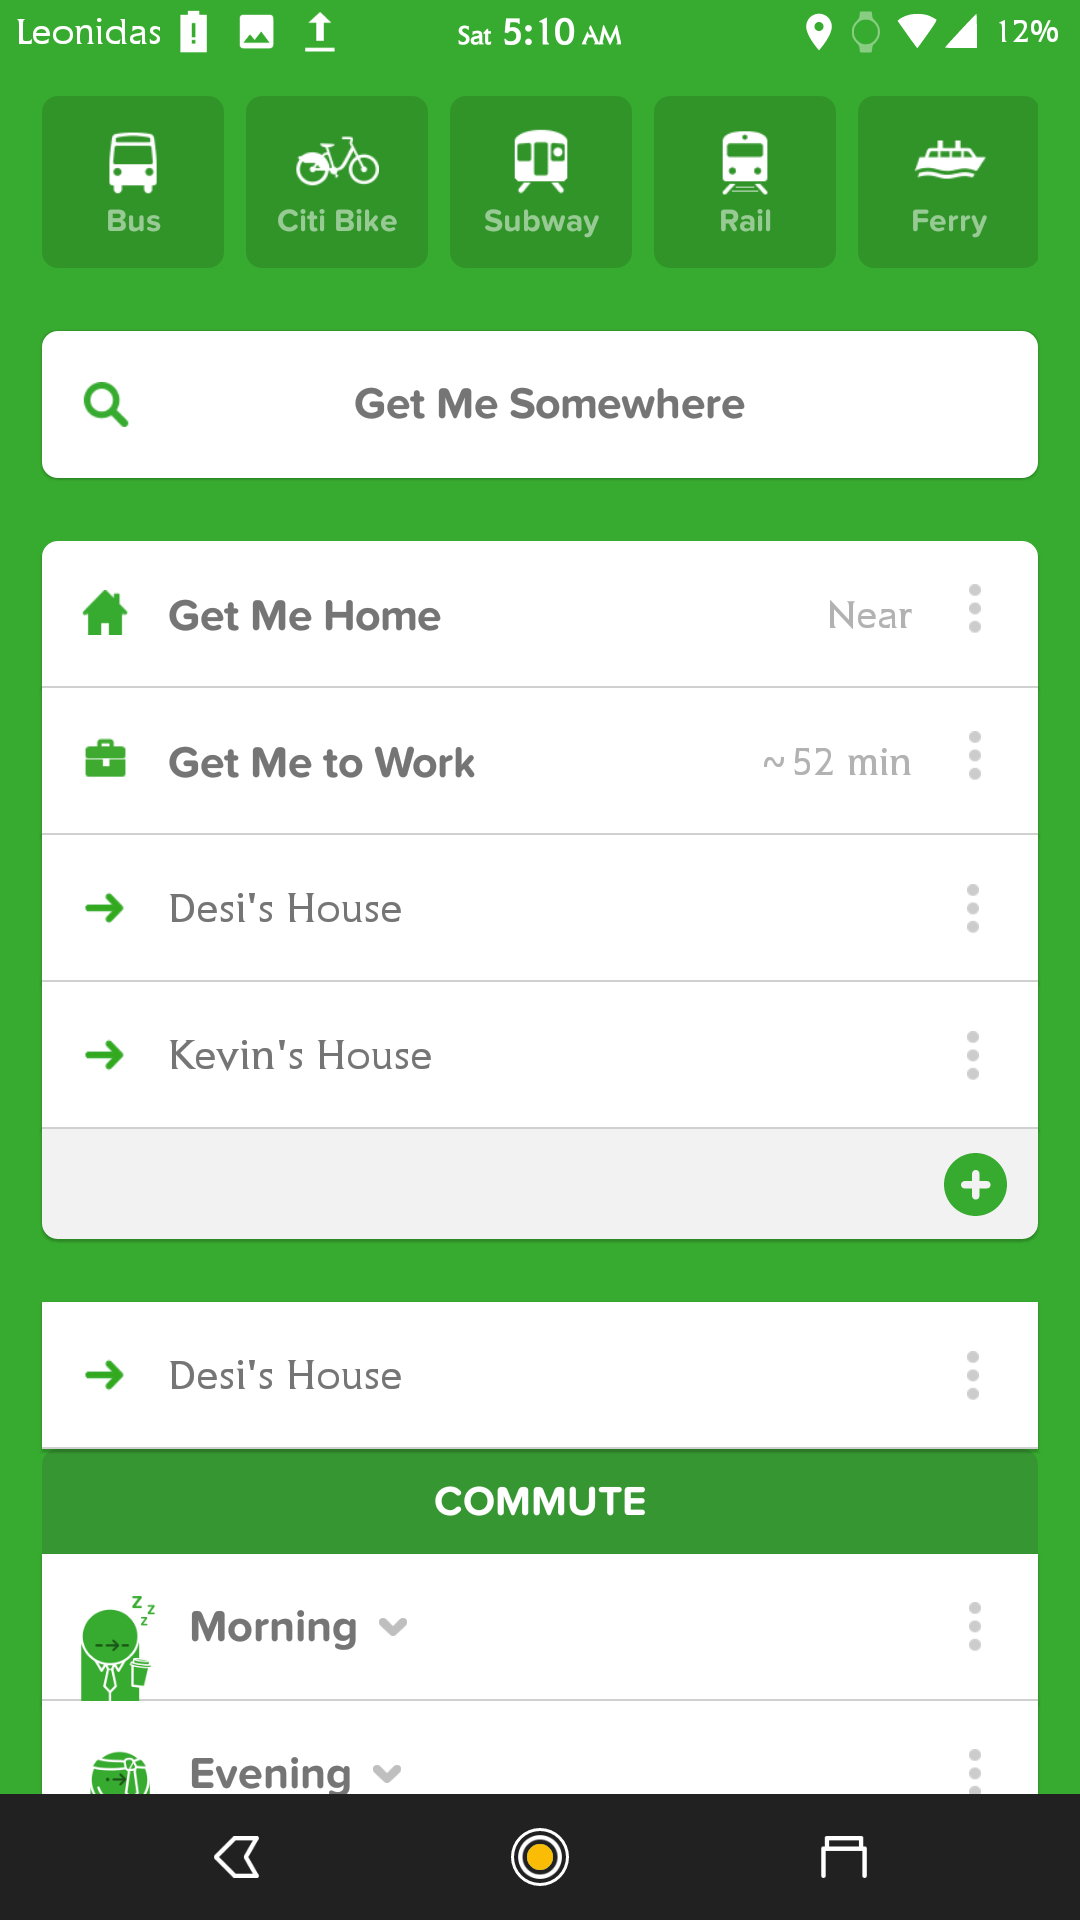
When it comes to commuting with public transportation, I go with Citymapper for the info I need about trains and buses along with planned service changes. This map service is based off of Google Maps but aims to focus solely on public transportation, it also offers ways to link up with Uber. You can set a home and work place with options to setup smart commute notifications before leaving home and before leaving work, you can also save places you’ve visited for easier access later. This app gives you real-time notifications as you go, in case you’re not really paying attention and almost miss your stop your phone and Wear will vibrate when you’ve reached the stop before your stop (it depends mostly on how well it tracks your location, it uses that to determine the best routes for you and the time you must wait for the next train or bus). Before I forget I want to mention that Citymapper is compatible with Android Wear and this might just be my favorite thing about Citymapper, the way notifications are handled with Wear is great as-is. You will need a Google or Facebook account to sync your user settings.

This app isn’t available for all cities, but that’s not a problem and I makes sense since not all cities rely on public transportation. With each update, new cities and languages are added worldwide. If you ever take a trip to New York City, I suggest using Citymapper to get around. Also, this one is free!!

Citymapper on Play Store


To conclude, these are my top 5 rated apps and I use these every day. These are essential for me and the are the first 5 apps I would think of installing anytime I would get a new device. Please feel free to discuss what you like about these apps on the comment section.

[App Reviews] Gabriel’s five essential applications

Facebook Lite

I’m not really the social media type, however I do have friends and family that are on Facebook. For me there was no avoiding using the service. I find the Facebook app on the Play Store to be a bloated mess that eats up storage and battery. I wanted an alternative to the Facebook app that does does the basics right. That is why I use Facebook Lite.

Essentially, it does the basics like messaging and looking through your feed. It’s better than the alternatives because it’s very small in size and doesn’t use a lot of RAM which is fantastic. I can install it on high end or low end devices without having to worry about running into issues.

Clover 4Chan Browser

Clover is an image board viewer for the popular site 4chan. Clover is another lite application that looks modern with its material design look. I find it essential because I spend time on it finding great wallpaper and book recommendations. The app has different boards that are based on interests like literature, videos games, anime, or technology. There are alternative apps for browsing 4chan but I find this better than the rest because of its great look and functionality.

Google Hangouts

Hangouts has been the first application I install or update on a new device I get because my friends and I tend to video call a lot and have group conversations. Cell coverage on my college campus is horrible, but luckily there is always a Wi-Fi network to connect to. That’s when Hangouts google voice functionality comes into play. When my friends or family who aren’t on Facebook need to contact me a simple text message to my Google Voice number will notify me on Hangouts. If someone I don’t know too well asks for my number, I’ll give them my Google Number just in case.  There are alternatives such as Facebook Messenger, but not everyone is willing to install it.

PlayerPro

PlayerPro is another essential application for me because it’s been a solid and reliable music app that also plays videos. It may not seem like the most eye pleasing music player when first opening the application, however there are several skins available like Skin Pure Black. PlayerPro can play various types of audio files which comes in handy. I have been using PlayerPro going back to the days when Gingerbread 2.3 was powering many people’s devices. There is also a DSP pack to download as an option if tweaking the way music sounds is your thing.  I find it better than the alternatives such as Poweramp and BlackPlayer because it offers lots of features while still being lite.

OG YouTube

Disclaimer: This app violates Google’s terms of service and allows you to download content that may be copyright protected.

There’s many times where I find a song on YouTube that I like but I want to download it that’s when this app comes in handy for me. There is an option to download the video or just the audio track. While watching a video, the audio will continue playing while the screen is off. There’s also a feature that allows you to switch to a floating window on top of other applications.

[Linux] Update adb & fastboot to the latest version

The latest version of adb is 1.0.39, however the version available from the Ubuntu repositories is 1.0.32. The repo version is dated March 2016, however ADB v1.0.32 was released when Lollipop launched.

Google recently made it easier to grab just the latest platform tools rather than download the whole Android SDK. I’ve written a small script to manually update adb and fastboot.

#!/bin/bash
wget https://dl.google.com/android/repository/platform-tools-latest-linux.zip
unzip \platform-tools-latest-linux.zip
sudo cp platform-tools/adb /usr/bin/adb
sudo cp platform-tools/fastboot /usr/bin/fastboot

Now run adb version to verify it’s been updated.

Copy & paste that into your favorite text editor like gedit or notepadqq, save it as a shell script and make it executable. When a new version of Android is released would be a good time to run it in case there’s new version of the platform tools.

[Android] 6 ways to flash a boot.img

  1. A handy app like Flashify or Rashr
  2. If you’re a franco.Kernel user & have FKU installed, You can use the built-in File Manager to browse to anywhere on your SD card & choose your boot.img
  3. Via adb:  fastboot flash boot boot.img
  4. One can also temporarily flash a boot.img into memory that only persists until the next reboot whereupon the the original permanent kernel is used again: fastboot boot boot.img
  5. Open an existing flashable ZIP, replace the boot.img with the newer one then flash it via recovery
  6. Copy your boot.img to the root of your SD card. Then type the following in an adb shell:  dd if=/sdcard/boot.img of=/dev/block/platform/msm_sdcc.1/by-name/boot.img

— credit goes to Francisco Franco (XDA, G+) for inspiring me to write this

Welcome to GravityBox

GravityBx

You’re here because you heard about the wonders of GravityBox. You’re excited to install it right now without any further ado. You’re in the right place! Hey, just to make sure you’ll be able to take advantage of all it’s capabilities without any issues, we’ve created this comprehensive guide to make sure it’ll be smooth sailing.


GravityBox Introduction

First and foremost, you must have a vanilla  AOSP ROM (or close to)  installed on your device. GravityBox comes in two flavors: Android 4.1, 4.2 or 4.3 (Jelly Bean) and Android 4.4+(Kit Kat). Plain AOSP ROM’s can be found installed stock on Google Nexus & Google Play Edition devices. Recently support has also been added to the Moto G Dual SIM (stock Kit Kat only). If you have an MTK device with Jelly Bean, you’re in luck. It supports a majority of MTK6589, MTK6577, MTK8389 devices. For Kit Kat, initial MTK support has just been added for the ThL 5000 (MTK6592).

But wait! My device / ROM was not mentioned! My ROM is based on AOSP, will that work?

stop

Installing on a proprietary stock manufacturer ROM like Samsung or HTC, or any custom ROM like Cyanogenmod or Paranoid Android is like installing two ROM’s on top of each other. Impossible and preposterous. Even though your ROM may look like stock AOSP, the code behind the scenes has been modified heavily.

If you insist and install it anyway, you’re on your own. No support is offered. You are not welcome to report “bugs” on neither the XDA thread, Google Plus nor any other method of contacting the developer. You’re free to create your own thread somewhere else to talk about using GravityBox on unsupported devices / ROM’s. If your favorite custom ROM is missing features you require, please contact your ROM team for further customization options.

Before we begin, please read the entire first post of the appropriate XDA Developers forum thread. For Jelly Bean, see here and for Kit Kat see here. Please especially note the compatibility information in red. We also have our own FAQ page.

Now that you’ve verified you qualify to enhance your device with GravityBox to the fullest, we’ll proceed to installation.

GravityBox Installation

GravityBox requires a rooted device with the Xposed Installer (Framework) installed. If you don’t have the Xposed Framework installed, you can install it here.

After installing, open it and tap on Framework.

Since I already have it installed, the active version numbers are green. You’ll see yours are still red. Press the Install/Update button. You will be prompted to allow Xposed root access. Once that’s done, you can reboot by pressing the Reboot button. Do not use the Soft reboot option.

After rebooting, launch the Xposed Installer from your app drawer & tap Download. This is where you can find Xposed Modules from the Xposed Repository within the Installer. Tap the search icon at the top.

By the time you’ve typed “grav”, you’ll see GravityBox [KK] and GravityBox [JB]. Pick your applicable flavor and swipe to the right to the Versions tab.

Tap the Download button to install the latest version. After it’s installed, tap Done instead of Open like you normally might. You’ll soon see a new notification from the Xposed Installer that you have a module installed but not activated. The notification will give you the option to activate & reboot. Alternately, you can hit your Back button twice to return to the main Xposed Installer menu & tap Modules. You’ll see GravityBox listed. Check the box on the right to activate it & reboot.

Now that you’ve successfully installed GravityBox, activated it & rebooted you’re ready to start tweaking the settings to you liking. You’ll find GravityBox in your app drawer just like any other app.

Screenshot tutorial  coming soon!

 Here’s a video installation & activation tutorial:

A good review I found on YouTube by Jared Busch:

https://www.youtube.com/watch?v=Szwg6GyRrBo

GravityBox was also featured on XDA Developer TV:

https://www.youtube.com/watch?v=68EwHBOyKPE